


Next.jsに入門してみた(Chapter13〜16)【Next.js, React】

Next.jsに改めて入門しようと思い、公式サイトの「Learn Next.js」というチュートリアル(?)をやっていきます。
かなり長いチュートリアルだったので複数回に分け紹介しており、こちらの記事はChapter13〜Chapter16の内容になります。
Chapter1〜Chapter12までの内容は下記をご覧ください。


なお記事の内容は下記に注意してご覧くださいm(_ _)m
- こちらの記事は2023年12月3日現在の情報になります。
- 公式サイトのチュートリアルを翻訳し(主にGoogle翻訳を使わせていただきました)、僕自身の解釈や理解を伝えるものになります。
- わかりやすくするために、翻訳通りの説明になっていない部分や、僕自身が調べて追加説明してある部分があります。
- 公式に書かれていることを全て書いていませんし、公式の見解と一致しているとは限りません。
※間違え等あればご連絡くださいm(_ _)m
目次
- 1 環境・バージョン
- 2 Chapter 13(Handling Errors)
- 3 Chapter 14(Improving Accessibility)
- 4 Chapter 15(Adding Authentication)
- 4.1 認証とは?(What is authentication?)
- 4.2 認証と認可(Authentication vs. Authorization)
- 4.3 ログインページの作成(Creating the login route)
- 4.4 NextAuth.js
- 4.5 ページオプションの追加(Adding the pages option)
- 4.6 Next.jsのミドルウェアでルート(ページ)を保護する(Protecting your routes with Next.js Middleware)
- 4.7 パスワードのハッシュ化(Adding the Credentials provider)
- 4.8 Credentials providerの追加(Adding the Credentials provider)
- 4.9 サインイン機能の追加(Adding the sign in functionality)
- 4.10 ログインフォームの更新(Updating the login form)
- 4.11 ログアウト機能の追加(Adding the logout functionality)
- 5 Chapter 16(Adding Authentication)
- 6 終わりに
環境・バージョン
- Mac OS
- Node.js 20.9.0(18よりも新しいものである必要がある)
- VSCode
Chapter 13(Handling Errors)
このChapterではJavaScriptの「try/catch」とNext.jsのAPIを使用してエラーを適切に処理する方法を見ていきます。
Server Actionsへのtry/catchの追加(Adding try/catch to Server Actions)
まず、JavaScriptの「try/catch」をServer Actionsに追加して、エラーを適切に処理できるようにします。
※下記が答えですが、try/catchの使い方を知っている人はまずはどのように書くべきか自分で考えてみましょう!
export async function createInvoice(formData: FormData) {
  const { customerId, amount, status } = CreateInvoice.parse({
    customerId: formData.get('customerId'),
    amount: formData.get('amount'),
    status: formData.get('status'),
  });

  const amountInCents = amount * 100;
  const date = new Date().toISOString().split('T')[0];

  try {
    await sql`
      INSERT INTO invoices (customer_id, amount, status, date)
      VALUES (${customerId}, ${amountInCents}, ${status}, ${date})
    `;
  } catch (error) {
    return {
      message: 'Database Error: Failed to Create Invoice.',
    };
  }

  revalidatePath('/dashboard/invoices');
  redirect('/dashboard/invoices');
}

export async function updateInvoice(id: string, formData: FormData) {
  const { customerId, amount, status } = UpdateInvoice.parse({
    customerId: formData.get('customerId'),
    amount: formData.get('amount'),
    status: formData.get('status'),
  });

  const amountInCents = amount * 100;

  try {
    await sql`
        UPDATE invoices
        SET customer_id = ${customerId}, amount = ${amountInCents}, status = ${status}
        WHERE id = ${id}
      `;
  } catch (error) {
    return { message: 'Database Error: Failed to Update Invoice.' };
  }

  revalidatePath('/dashboard/invoices');
  redirect('/dashboard/invoices');
}

export async function deleteInvoice(id: string) {
  try {
    await sql`DELETE FROM invoices WHERE id = ${id}`;
    revalidatePath('/dashboard/invoices');
    return { message: 'Deleted Invoice.' };
  } catch (error) {
    return { message: 'Database Error: Failed to Delete Invoice.' };
  }
}
redirect処理がtry/catchの外に書かれているのは、sqlの処理が成功した時のみリダイレクトさせていたからです。
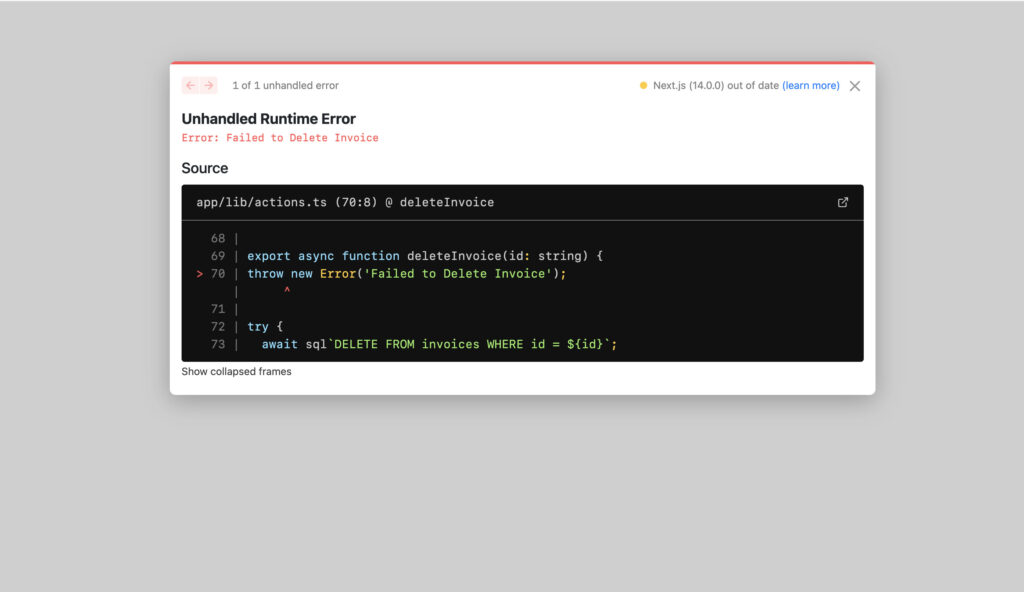
ここで、Server Actionでエラーがスローされた(起きた)場合に何が起こるかを確認してみます。これを行うには、事前にエラーを起こします(スローします)。たとえば、下記のようにdeleteInvoiceアクションで、関数の先頭でエラーをスローします。
export async function deleteInvoice(id: string) {
  throw new Error('Failed to Delete Invoice');

  // 下記のコードブロックには届きません
  try {
    await sql`DELETE FROM invoices WHERE id = ${id}`;
    revalidatePath('/dashboard/invoices');
    return { message: 'Deleted Invoice' };
  } catch (error) {
    return { message: 'Database Error: Failed to Delete Invoice' };
  }
}
では「http://localhost:3000/dashboard/invoices」を開いて、請求書の削除ボタンを押してみてください。下のようなエラーが起きます。
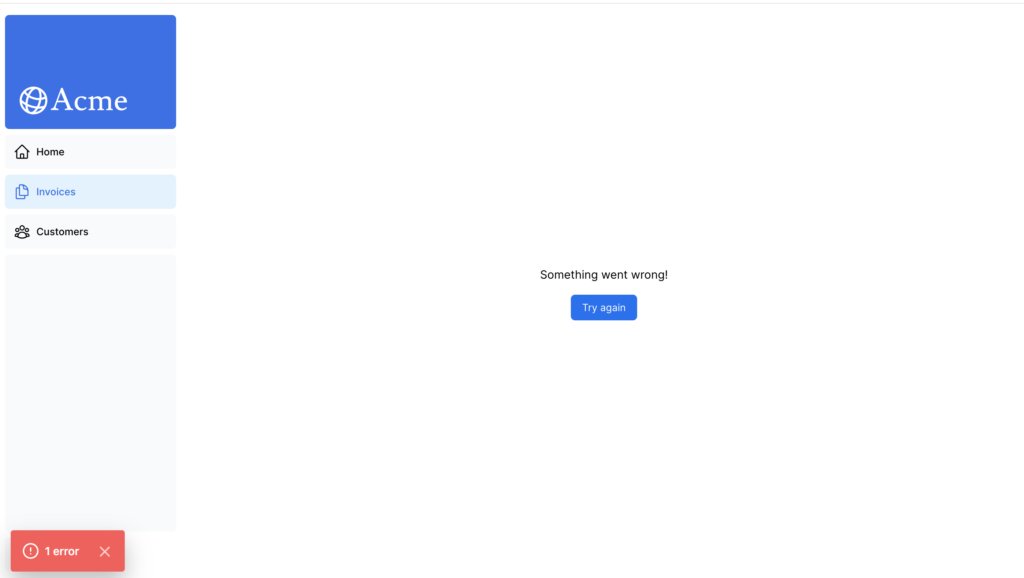
これらのエラーを確認すると、潜在的な問題を早期に発見できるため、開発中に役立ちます。 しかし、運用中のアプリケーションでは、突然の障害を避けてアプリケーションの実行を継続できるように、ユーザーにエラーを表示することも必要です。
そんな時に、Next.jsの「error.tsx」を使います。
error.tsx によるすべてのエラーの処理(Handling all errors with error.tsx)
error.tsxファイルを使用して、ルートセグメントのUI境界を定義(特定のフォルダにerror.tsxを置くことで、そのフォルダとその配下のファイルでエラーが起きた時に表示するUIになるということだと思います。)できます。これは、予期しないすべてのエラーをキャッチして、ユーザーにフォールバックUI(上の画像のようなエラー画面を見せないようにする)を表示できるようにするものです。
「/app/dashboard/invoices」フォルダー内にerror.tsxという新しいファイルを作成し、次のコードを貼り付けます。
'use client';

import { useEffect } from 'react';

export default function Error({
  error,
  reset,
}: {
  error: Error & { digest?: string };
  reset: () => void;
}) {
  useEffect(() => {
    // Optionally log the error to an error reporting service
    console.error(error);
  }, [error]);

  return (
    <main className="flex h-full flex-col items-center justify-center">
      <h2 className="text-center">Something went wrong!</h2>
      <button
        className="mt-4 rounded-md bg-blue-500 px-4 py-2 text-sm text-white transition-colors hover:bg-blue-400"
        onClick={
          // Attempt to recover by trying to re-render the invoices route
          () => reset()
        }
      >
        Try again
      </button>
    </main>
  );
}
上記のコードについて
- “use client” : error.tsxはクライアントコンポーネントである必要があります。
- reset : エラー境界をリセットする機能です。 実行されると、関数はルートセグメントの再レンダリングを試みます。
請求書を再度削除しようとすると、下の画像のUIが表示されます。
notFound関数を使用した404エラーの処理(Handling 404 errors with the notFound function)
エラーを適切に処理するもう1つの方法は、「notFound」関数を使用することです。 error.tsxはすべてのエラーをキャッチするのに便利ですが、notFound関数は存在しないリソースを取得しようとするときに使用できます。
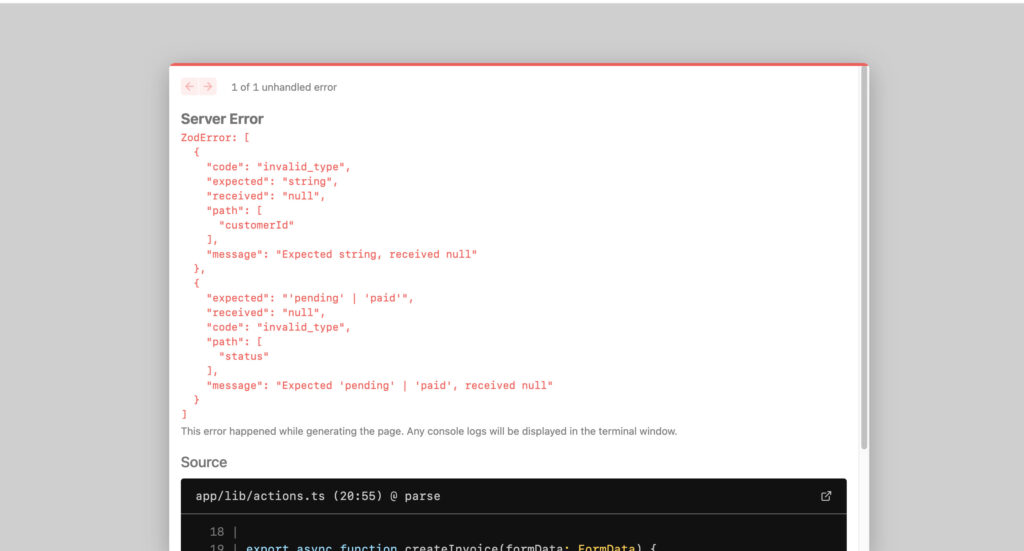
たとえば、「http://localhost:3000/dashboard/invoices/2e94d1ed-d220-449f-9f11-f0bbceed9645/edit」にアクセスします。
上記URLのUUID部分はデータベースに存在しない偽のものです。(わざとエラーを起こすためのURL)
これは、error.tsxが定義されている「/app/dashboard/invoices」の子ルートであるため、error.tsxが適用されるので下の画像のような画面になると思います。
ただし、エラーの内容をより具体的にするために、404エラーを表示して、アクセスしようとしているリソースが見つからなかったことをユーザーに伝えることができます。
「/app/lib/data.ts」のfetchInvoiceById関数に移動し、下記のようにconsole.logを仕込むことで、「http://localhost:3000/dashboard/invoices/2e94d1ed-d220-449f-9f11-f0bbceed9645/edit」をリロードすることで、請求書のデータが見つからなかったことをターミナルで確認できます。(見本コードだと分かりずらかったので、「console.log(“請求書のデータ”, invoice)」としました)
export async function fetchInvoiceById(id: string) {
  noStore();
  try {
    // ...

    console.log("請求書のデータ", invoice); // Invoice is an empty array []
    return invoice[0];
  } catch (error) {
    console.error('Database Error:', error);
    throw new Error('Failed to fetch invoice.');
  }
}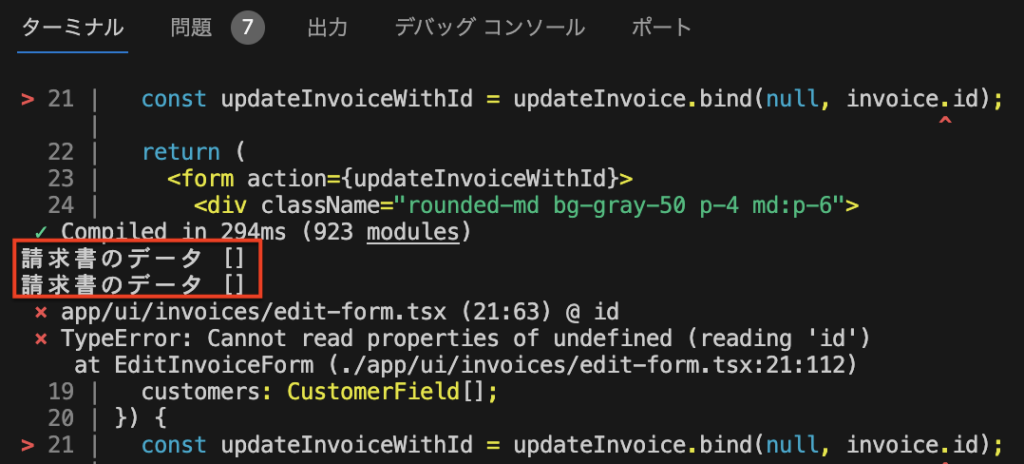
idが「2e94d1ed-d220-449f-9f11-f0bbceed9645」の請求書がデータベースに存在しないことがわかったので、notFoundを使用して処理できるようにします。
下記のように「/app/dashboard/invoices/[id]/edit/page.tsx」で「next/navigation」から { notFound } をインポートします。
import { fetchInvoiceById, fetchCustomers } from '@/app/lib/data';
import { updateInvoice } from '@/app/lib/actions';
import { notFound } from 'next/navigation';

export default async function Page({ params }: { params: { id: string } }) {
  const id = params.id;
  const [invoice, customers] = await Promise.all([
    fetchInvoiceById(id),
    fetchCustomers(),
  ]);

  if (!invoice) {
    notFound();
  }

  // ...
}
これで、「/app/dashboard/invoices/[id]/edit/page.tsx」の<Page>は、特定の請求書が見つからない場合に、エラーをスローするようになりました。
続いて、エラーUIを表示するために、「/edit」フォルダー内に「not-found.tsx」ファイルを作成します。
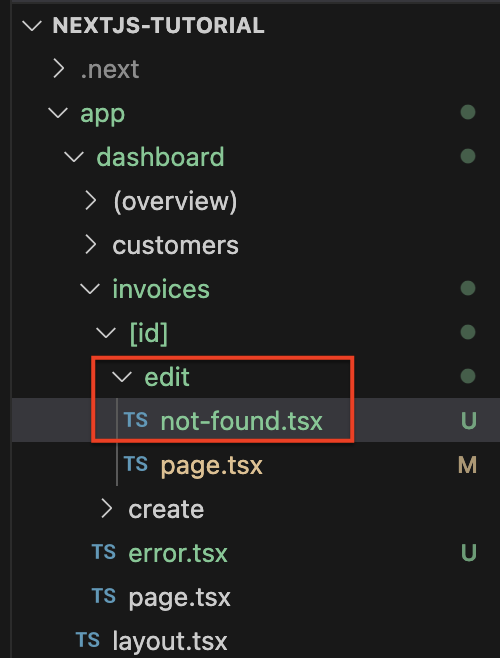
そして下記のコードをnot-found.tsxに貼ります。
import Link from 'next/link';
import { FaceFrownIcon } from '@heroicons/react/24/outline';

export default function NotFound() {
  return (
    <main className="flex h-full flex-col items-center justify-center gap-2">
      <FaceFrownIcon className="w-10 text-gray-400" />
      <h2 className="text-xl font-semibold">404 Not Found</h2>
      <p>Could not find the requested invoice.</p>
      <Link
        href="/dashboard/invoices"
        className="mt-4 rounded-md bg-blue-500 px-4 py-2 text-sm text-white transition-colors hover:bg-blue-400"
      >
        Go Back
      </Link>
    </main>
  );
}
では、「http://localhost:3000/dashboard/invoices/2e94d1ed-d220-449f-9f11-f0bbceed9645/edit」をリロードしましょう。
下の画像のようになっていればOKです。

notFoundはerror.tsxよりも優先されるため、より具体的なエラーを処理したい場合は、notFoundを使用します。
Chapter 14(Improving Accessibility)
このChapterでは、アクセシビリティを考えながら、Server Actionsを使用してサーバー再度でのフォームのバリデーションを実装する方法と、「useFormState」フックを使用してフォーム エラーを表示する方法を見てみましょう。
アクセシビリティとは?(What is accessibility?)
アクセシビリティとは、障害のある人を含む誰もが使用しやすいWebアプリケーションを設計および実装することを指します。これは、キーボード、ナビゲーション、セマンティック HTML、画像、色、ビデオなど、多くの領域をカバーする広いトピックです。
このコースではアクセシビリティについては詳しく説明しませんが、Next.jsで利用できるアクセシビリティ機能と、アプリケーションのアクセシビリティを高めるための一般的な実践方法について説明します。
Next.jsでESLintアクセシビリティプラグインを使用する(Using the ESLint accessibility plugin in Next.js)
デフォルトでは、Next.jsに、アクセシビリティの問題を早期に発見するのに役立つ「eslint-plugin-jsx-a11y」プラグインが含まれています。たとえば、このプラグインは、代替テキスト(alt属性)のない画像がある場合、aria-* 属性とrole属性が間違って使用されている場合などに警告します。
上記がどのように機能するかを見てみましょう!
下記のように「next lint」を package.jsonファイルにスクリプトとして追加します。
"scripts": {
    "build": "next build",
    "dev": "next dev",
    "seed": "node -r dotenv/config ./scripts/seed.js",
    "start": "next start",
    "lint": "next lint"
},次に、ターミナルで「npm run lint」を実行します。
npm run lint下記のようなメッセージがターミナルに表示されるはずです。(警告やエラーがないので問題ないということだと思う!)

では、alt属性がない画像があった場合どうなるか試してみます。
下記のように「/app/ui/invoices/table.tsx」の画像からalt属性を削除してみます。
<Image
  src={invoice.image_url}
  className="rounded-full"
  width={28}
  height={28}
  alt={`${invoice.name}'s profile picture`} // この行を削除
/>
再度ターミナルで「npm run lint」を実行すると下の画像のような警告が表示されます。(altが必要というメッセージ)

アプリケーションをVercelにデプロイしようとすると、next lintがビルドプロセスの一部として実行されるので、警告がビルドログにも表示されます。したがって、アプリケーションをデプロイする前に、ローカルでlintを実行してアクセシビリティの問題を検出できます。
フォームのアクセシビリティの向上(Improving form accessibility)
これまでで、フォームのアクセシビリティを向上させるために、すでに下記の3つのことを行っています。
- セマンティック HTML : <div>要素の代わりにセマンティックな要素 (<input>、<option>など) を使用しています。これにより、支援技術が入力要素に焦点を当て、適切なコンテキスト情報をユーザーに提供できるようになり、フォームのナビゲーションと理解が容易になります。
- ラベル付け : <label>要素と「htmlFor」属性を含めると、各フォームフィールドに説明的なテキストラベルが付けられます。 これにより、コンテキストが提供されることで支援技術サポートが向上し、ユーザーがラベルをクリックして対応する入力フィールドにフォーカスできるようになり、使いやすさも向上します。
- Focus Outline : フィールドは、フォーカスがあるときにアウトラインを表示するように適切にスタイル設定されます。これは、ページ上のアクティブな要素を視覚的に示し、キーボードユーザーとスクリーンリーダーユーザーの両方がフォーム上のどこにいるかを理解するのに役立つため、アクセシビリティにとって重要です。これを確認するには、Tabキーを押します。
上記は、フォームを多くのユーザーがアクセスしやすしています。しかし、フォームのバリデーションとエラーには対応していません。
フォームのバリデーション(Form validation)
「http://localhost:3000/dashboard/invoices/create」を開いて、フォームには何も入力せずに空のまま「Create Invoice」ボタンを押してみます。
下の画像のようにエラーが起きます。
これは、空のフォーム値をServer Actionに送信しているためです。これを防ぐには、クライアントまたはサーバーでフォームの値を検証します(バリデーション)。
まずは、クライアントサイドを見ていきます。
クライアントサイドでフォームを検証するには、いくつかの方法があります。
最も簡単な方法は、下記ののように、フォーム内の<input>要素と<select>要素に「required」属性を追加することで、ブラウザーがデフォルトで提供するフォーム検証をすることです。
<input
  id="amount"
  name="amount"
  type="number"
  placeholder="Enter USD amount"
  className="peer block w-full rounded-md border border-gray-200 py-2 pl-10 text-sm outline-2 placeholder:text-gray-500"
  required
/>
上記のようにrequiredを設定したあと、フォームを再度送信すると、空の値の場合、下の画像のようにブラウザに警告が表示されます。

一部の支援技術はブラウザー検証をサポートしているため、このアプローチは通常は問題ありません。
クライアントサイドの検証の代替手段は、サーバーサイドでの検証です。続いてサーバーサイドを見てきます。(上記で追加した「required」属性は削除しておいてください)
サーバーサイドでフォームを検証することで、下記のことが可能になります。
- データをデータベースに送信する前に、データが期待される形式であることを確認できる。
- 悪意のあるユーザーがクライアントサイドの検証をバイパスする(回避する)リスクを減らす。
- 有効なデータとみなされるものについての信頼できる情報源を1つ用意します。
まず、下記のように「/app/ui/invoices/create-form.tsx」のcreate-form.tsxコンポーネントで、「react-dom」から「useFormState」フックをインポートします。「useFormState」はフックであるため、「use client」の記述をして、フォームをクライアントコンポーネントにする必要があります。
'use client';

// ...
import { useFormState } from 'react-dom';
useFormStateフックは次のようになります。
- 2つの引数を取ります : (action、initialState)。
- 2つの値を返します : [state,dispatch] – フォームの状態、およびディスパッチ関数 (useReducer と同様)
createInvoiceアクションをuseFormStateを引数として渡し、 <form action={}>でdispatchを呼び出します
// ...
import { useFormState } from 'react-dom';

export default function Form({ customers }: { customers: CustomerField[] }) {
  const [state, dispatch] = useFormState(createInvoice, initialState);

  return <form action={dispatch}>...</form>;
}
「initialState」には任意の値を定義できます。この場合は、下記のようにmessageとerrorsという2つの空のキーを持つオブジェクトを作成します。
// ...
import { useFormState } from 'react-dom';

export default function Form({ customers }: { customers: CustomerField[] }) {
  const initialState = { message: null, errors: {} };
  const [state, dispatch] = useFormState(createInvoice, initialState);

  return <form action={dispatch}>...</form>;
}
続いて、「/app/lib/action.ts」で、Zodを使用してフォームのデータを検証します。
下記のようにFormSchemaを更新します。
const FormSchema = z.object({
  id: z.string(),
  customerId: z.string({
    invalid_type_error: 'Please select a customer.',
  }),
  amount: z.coerce
    .number()
    .gt(0, { message: 'Please enter an amount greater than $0.' }),
  status: z.enum(['pending', 'paid'], {
    invalid_type_error: 'Please select an invoice status.',
  }),
  date: z.string(),
});
上記のコードは下記のことを実装しています。
- customerId – 既にZodでタイプ文字列を期待しているため、customerフィールドが空の場合、エラーをスローします。ただし、ユーザーが顧客を選択しない場合は、なぜエラーなのかがわかるようなフレンドリーなメッセージを追加しています。
- amount – amouunのタイプを文字列から数値に強制しているため、文字列が空の場合はデフォルトでゼロになります。「.gt()」 関数を使用して、常に0より大きい量が必要であることを設定しています。
- status – 既にZodで「pending」または「paid」が選択されるように設定しているため、statusフィールドが空の場合、エラーをスローします。ユーザーがステータスを選択しない場合には、なぜエラーなのかがわかるようなフレンドリーなメッセージも追加しています。
次に、下記のようにcreateInvoiceアクションを更新して、2つのパラメーターを受け入れるようにします。
// This is temporary until @types/react-dom is updated
export type State = {
  errors?: {
    customerId?: string[];
    amount?: string[];
    status?: string[];
  };
  message?: string | null;
};

export async function createInvoice(prevState: State, formData: FormData) {
  // ...
}
2つのパラーメーターは下記の通りです。
- formData – 前から存在したものなので説明なし。
- prevState – useFormStateフックから渡された状態(state)が含まれます。この例のアクションでは使用しませんが、必須のpropです。
次に、Zodのparse()を「safeParse()」に変更します。
export async function createInvoice(prevState: State, formData: FormData) {
  // Validate form fields using Zod
  const validatedFields = CreateInvoice.safeParse({
    customerId: formData.get('customerId'),
    amount: formData.get('amount'),
    status: formData.get('status'),
  });

  // ...
}
safeParse()は、successフィールドまたはerrorフィールドのいずれかを含むオブジェクトを返します。これにより、このロジックをtry/catchブロック内に配置しなくても、検証をより適切に処理できるようになります。
そして、下記のようにして、情報をデータベースに送信する前に、フォームフィールドが設定した条件で正しく検証されたかどうかを確認します。
export async function createInvoice(prevState: State, formData: FormData) {
  // Validate form fields using Zod
  const validatedFields = CreateInvoice.safeParse({
    customerId: formData.get('customerId'),
    amount: formData.get('amount'),
    status: formData.get('status'),
  });

  // If form validation fails, return errors early. Otherwise, continue.(フォームの検証が失敗した場合は、早期にエラーを返します。 それ以外の場合は続行します。)
  if (!validatedFields.success) {
    return {
      errors: validatedFields.error.flatten().fieldErrors,
      message: 'Missing Fields. Failed to Create Invoice.',
    };
  }

  // ...
}
validatedFieldsが「success」でない場合は、Zodからのエラーメッセージとともに関数が早期に返されます。
最後に、try/catchブロックの外側でフォームの検証を個別に処理しているため、データベースエラーに対して特定のメッセージを返すことができ(データベースでのエラーはtry/catchで処理できるということだと思う)、最終的なコードは下記のようになります。
export async function createInvoice(prevState: State, formData: FormData) {
  // Validate form using Zod
  const validatedFields = CreateInvoice.safeParse({
    customerId: formData.get('customerId'),
    amount: formData.get('amount'),
    status: formData.get('status'),
  });

  // If form validation fails, return errors early. Otherwise, continue.
  if (!validatedFields.success) {
    return {
      errors: validatedFields.error.flatten().fieldErrors,
      message: 'Missing Fields. Failed to Create Invoice.',
    };
  }

  // Prepare data for insertion into the database
  const { customerId, amount, status } = validatedFields.data;
  const amountInCents = amount * 100;
  const date = new Date().toISOString().split('T')[0];

  // Insert data into the database
  try {
    await sql`
      INSERT INTO invoices (customer_id, amount, status, date)
      VALUES (${customerId}, ${amountInCents}, ${status}, ${date})
    `;
  } catch (error) {
    // If a database error occurs, return a more specific error.
    return {
      message: 'Database Error: Failed to Create Invoice.',
    };
  }

  // Revalidate the cache for the invoices page and redirect the user.
  revalidatePath('/dashboard/invoices');
  redirect('/dashboard/invoices');
}
それでは挙動を確認するために、フォームコンポーネントでエラーを表示しましょう。下記のように、フォームのstateを使って「/app/ui/invoices/create-form.tsx」でエラーを起こします。
<form action={dispatch}>
  <div className="rounded-md bg-gray-50 p-4 md:p-6">
    {/* Customer Name */}
    <div className="mb-4">
      <label htmlFor="customer" className="mb-2 block text-sm font-medium">
        Choose customer
      </label>
      <div className="relative">
        <select
          id="customer"
          name="customerId"
          className="peer block w-full rounded-md border border-gray-200 py-2 pl-10 text-sm outline-2 placeholder:text-gray-500"
          defaultValue=""
          aria-describedby="customer-error"
        >
          <option value="" disabled>
            Select a customer
          </option>
          {customerNames.map((name) => (
            <option key={name.id} value={name.id}>
              {name.name}
            </option>
          ))}
        </select>
        <UserCircleIcon className="pointer-events-none absolute left-3 top-1/2 h-[18px] w-[18px] -translate-y-1/2 text-gray-500" />
      </div>
      <div id="customer-error" aria-live="polite" aria-atomic="true">
        {state.errors?.customerId &&
          state.errors.customerId.map((error: string) => (
            <p className="mt-2 text-sm text-red-500" key={error}>
              {error}
            </p>
          ))}
      </div>
    </div>
    // ...
  </div>
</form>上記のコードでは、次の「aria」ラベルも追加しています。
- aria-descriptedby=”customer-error” : これにより、select要素とエラーメッセージ の要素を紐づけます。 ここでは、「id=”customer-error”」がついているdiv要素になります。ユーザーが選択ボックスを操作してエラーが発生すると、スクリーンリーダーはこの説明を読み上げます。
- id=”customer-error” : このid属性は、選択入力のエラーメッセージを保持するHTML要素を一意に識別します。 これは、aria-descriptionbyがついている要素と紐付きます。
- aria-live=”polite” : これがついているdiv内のエラーが更新された場合、スクリーンリーダーはユーザーに都度通知する必要があります。コンテンツが変更されると (たとえば、ユーザーがエラーの状態を修正してエラーがなくなる時)、スクリーンリーダーは変更を通知しますが、それはユーザーがアイドル状態(フォームへの入力などをしていないとき)の場合に限り、変更を中断しないようにします。
練習問題 : aria ラベルを追加する(Practice: Adding aria labels)
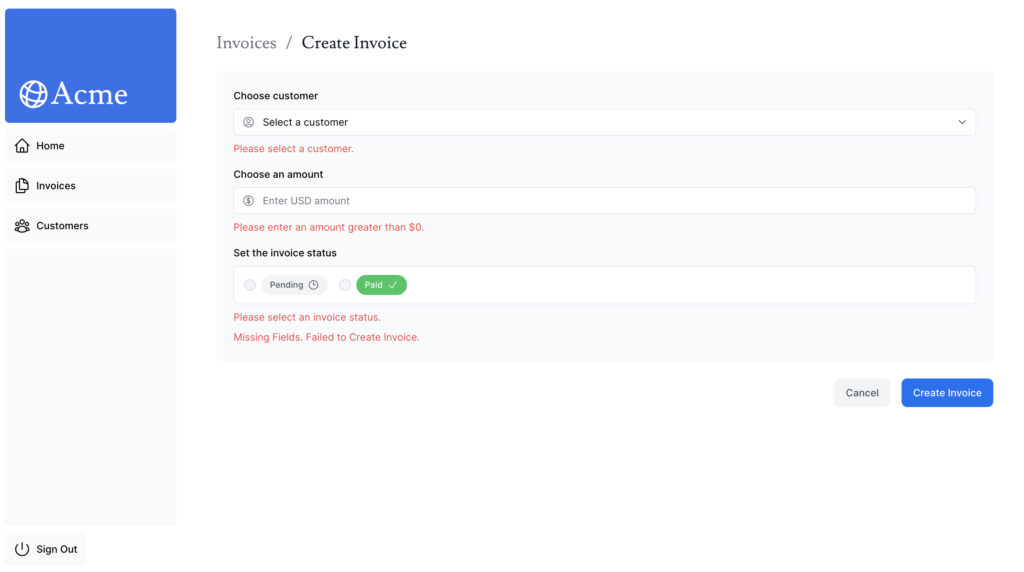
上の例を使用して、残りのフォームフィールドにエラーメッセージが出るようにコードを追加します。また、入力必須のフィールドに値がない場合は、フォームの下部にメッセージ(「Missing Fields. Failed to Create Invoice.」)を表示する必要もあります。 UIは下の画像のようになります。
上の画像の実装ができたら、「npm run lint」を実行して、ariaラベルが正しく使用されているか確認します。
残りは、請求書の編集機能のフォームにサーバーサイドでの検証を実装していきます。(このChapterで習ったことを活かして、自分自身で挑戦してみる部分)
※下記が正解になります。
請求書の登録機能の続き
'use client';

import { CustomerField } from '@/app/lib/definitions';
import Link from 'next/link';
import {
  CheckIcon,
  ClockIcon,
  CurrencyDollarIcon,
  UserCircleIcon,
} from '@heroicons/react/24/outline';
import { Button } from '@/app/ui/button';
import { createInvoice } from '@/app/lib/actions';
import { useFormState } from 'react-dom';

export default function Form({ customers }: { customers: CustomerField[] }) {
  const initialState = { message: null, errors: {} };
  const [state, dispatch] = useFormState(createInvoice, initialState);

  return (
    <form action={dispatch}>
      <div className="rounded-md bg-gray-50 p-4 md:p-6">
        {/* Customer Name */}
        <div className="mb-4">
          <label htmlFor="customer" className="mb-2 block text-sm font-medium">
            Choose customer
          </label>
          <div className="relative">
            <select
              id="customer"
              name="customerId"
              className="peer block w-full rounded-md border border-gray-200 py-2 pl-10 text-sm outline-2 placeholder:text-gray-500"
              defaultValue=""
              aria-describedby="customer-error"
            >
              <option value="" disabled>
                Select a customer
              </option>
              {customers.map((customer) => (
                <option key={customer.id} value={customer.id}>
                  {customer.name}
                </option>
              ))}
            </select>
            <UserCircleIcon className="pointer-events-none absolute left-3 top-1/2 h-[18px] w-[18px] -translate-y-1/2 text-gray-500" />
          </div>
          <div id="customer-error" aria-live="polite" aria-atomic="true">
            {state.errors?.customerId &&
              state.errors.customerId.map((error: string) => (
                <p className="mt-2 text-sm text-red-500" key={error}>
                  {error}
                </p>
              ))}
          </div>
        </div>

        {/* Invoice Amount */}
        <div className="mb-4">
          <label htmlFor="amount" className="mb-2 block text-sm font-medium">
            Choose an amount
          </label>
          <div className="relative mt-2 rounded-md">
            <div className="relative">
              <input
                id="amount"
                name="amount"
                type="number"
                step="0.01"
                placeholder="Enter USD amount"
                className="peer block w-full rounded-md border border-gray-200 py-2 pl-10 text-sm outline-2 placeholder:text-gray-500"
                aria-describedby="amount-error"
              />
              <CurrencyDollarIcon className="pointer-events-none absolute left-3 top-1/2 h-[18px] w-[18px] -translate-y-1/2 text-gray-500 peer-focus:text-gray-900" />
            </div>
            <div id="amount-error" aria-live="polite" aria-atomic="true">
              {state.errors?.amount &&
                state.errors.amount.map((error: string) => (
                  <p className="mt-2 text-sm text-red-500" key={error}>
                    {error}
                  </p>
                ))}
            </div>
          </div>
        </div>

        {/* Invoice Status */}
        <fieldset>
          <legend className="mb-2 block text-sm font-medium">
            Set the invoice status
          </legend>
          <div className="rounded-md border border-gray-200 bg-white px-[14px] py-3">
            <div className="flex gap-4">
              <div className="flex items-center">
                <input
                  id="pending"
                  name="status"
                  type="radio"
                  value="pending"
                  className="h-4 w-4 border-gray-300 bg-gray-100 text-gray-600 focus:ring-2 focus:ring-gray-500 dark:border-gray-600 dark:bg-gray-700 dark:ring-offset-gray-800 dark:focus:ring-gray-600"
                  aria-describedby="status-error"
                />
                <label
                  htmlFor="pending"
                  className="ml-2 flex items-center gap-1.5 rounded-full bg-gray-100 px-3 py-1.5 text-xs font-medium text-gray-600 dark:text-gray-300"
                >
                  Pending <ClockIcon className="h-4 w-4" />
                </label>
              </div>
              <div className="flex items-center">
                <input
                  id="paid"
                  name="status"
                  type="radio"
                  value="paid"
                  className="h-4 w-4 border-gray-300 bg-gray-100 text-gray-600 focus:ring-2 focus:ring-gray-500 dark:border-gray-600 dark:bg-gray-700 dark:ring-offset-gray-800 dark:focus:ring-gray-600"
                  aria-describedby="status-error"
                />
                <label
                  htmlFor="paid"
                  className="ml-2 flex items-center gap-1.5 rounded-full bg-green-500 px-3 py-1.5 text-xs font-medium text-white dark:text-gray-300"
                >
                  Paid <CheckIcon className="h-4 w-4" />
                </label>
              </div>
            </div>
          </div>
          <div id="status-error" aria-live="polite" aria-atomic="true">
            {state.errors?.status &&
              state.errors.status.map((error: string) => (
                <p className="mt-2 text-sm text-red-500" key={error}>
                  {error}
                </p>
              ))}
          </div>
        </fieldset>
        {state.message &&
          <p className="mt-2 text-sm text-red-500">
            {state.message}
          </p>
        }
      </div>
      <div className="mt-6 flex justify-end gap-4">
        <Link
          href="/dashboard/invoices"
          className="flex h-10 items-center rounded-lg bg-gray-100 px-4 text-sm font-medium text-gray-600 transition-colors hover:bg-gray-200"
        >
          Cancel
        </Link>
        <Button type="submit">Create Invoice</Button>
      </div>
    </form>
  );
}
請求書の編集機能
export default function EditInvoiceForm({
  invoice,
  customers,
}: {
  invoice: InvoiceForm;
  customers: CustomerField[];
}) {
  const initialState = { message: null, errors: {} };
  const updateInvoiceWithId = updateInvoice.bind(null, invoice.id);
  const [state, dispatch] = useFormState(updateInvoiceWithId, initialState);

  return <form action={dispatch}></form>;
}
※<form></form>タグ内のそれぞれの値を入れる部分のエラーメッセージや、フォーム全体のエラーメッセージは上記の「/app/ui/invoices/create-form.tsx」と同じ
export async function updateInvoice(
  id: string,
  prevState: State,
  formData: FormData,
) {
  const validatedFields = UpdateInvoice.safeParse({
    customerId: formData.get('customerId'),
    amount: formData.get('amount'),
    status: formData.get('status'),
  });

  if (!validatedFields.success) {
    return {
      errors: validatedFields.error.flatten().fieldErrors,
      message: 'Missing Fields. Failed to Update Invoice.',
    };
  }

  const { customerId, amount, status } = validatedFields.data;
  const amountInCents = amount * 100;

  try {
    await sql`
      UPDATE invoices
      SET customer_id = ${customerId}, amount = ${amountInCents}, status = ${status}
      WHERE id = ${id}
    `;
  } catch (error) {
    return { message: 'Database Error: Failed to Update Invoice.' };
  }

  revalidatePath('/dashboard/invoices');
  redirect('/dashboard/invoices');
}
Chapter 15(Adding Authentication)
このChapterでは、ダッシュボードに認証を追加していきます。
認証とは?(What is authentication?)
ユーザーが本人であるかどうかをシステムがチェックする方法です。
認証と認可(Authentication vs. Authorization)
- 認証(Authentication) : ユーザーが本人であることを確認することです。ユーザー名やパスワードなど、自分が持っているもので自分の身元を証明することになります。
- 認可(Authorization) : 認証でユーザー本人と確認されると、認可によってアプリケーションのどの部分の使用ができるかが決定されます。(例えば、「管理者ユーザーしか使えない管理画面がある」みたいなこと)
ログインページの作成(Creating the login route)
まず、アプリケーションに「/app/login」という新しいルート(「フォルダ、ページ、パス」そんなようなイメージ)を作成し、下記のコードを貼り付けます。
import AcmeLogo from '@/app/ui/acme-logo';
import LoginForm from '@/app/ui/login-form';

export default function LoginPage() {
  return (
    <main className="flex items-center justify-center md:h-screen">
      <div className="relative mx-auto flex w-full max-w-[400px] flex-col space-y-2.5 p-4 md:-mt-32">
        <div className="flex h-20 w-full items-end rounded-lg bg-blue-500 p-3 md:h-36">
          <div className="w-32 text-white md:w-36">
            <AcmeLogo />
          </div>
        </div>
        <LoginForm />
      </div>
    </main>
  );
}
<LoginForm />は後ほど更新するので、ここでは気にしなくてOKです。
NextAuth.js
「NextAuth.js」を使用してアプリケーションに認証を追加します。NextAuth.jsは、セッション、サインインとサインアウト、および認証のその他の側面の管理に伴う複雑さの多くを抽象化します。これらの機能を手動で実装することもできますが、それには時間がかかり、エラーが発生しやすくなります。NextAuth.jsは認証機能の実装を簡素化し、Next.js アプリケーションでの認証のための統合的(網羅的?)なソリューションを提供します。
ではNextAuth.jsを導入していきますので、まず、下記のコマンドをターミナルで実行してください。
npm install next-auth@betaここでは、Next.js14と互換性のあるNextAuth.jsのベータ版をインストールします。
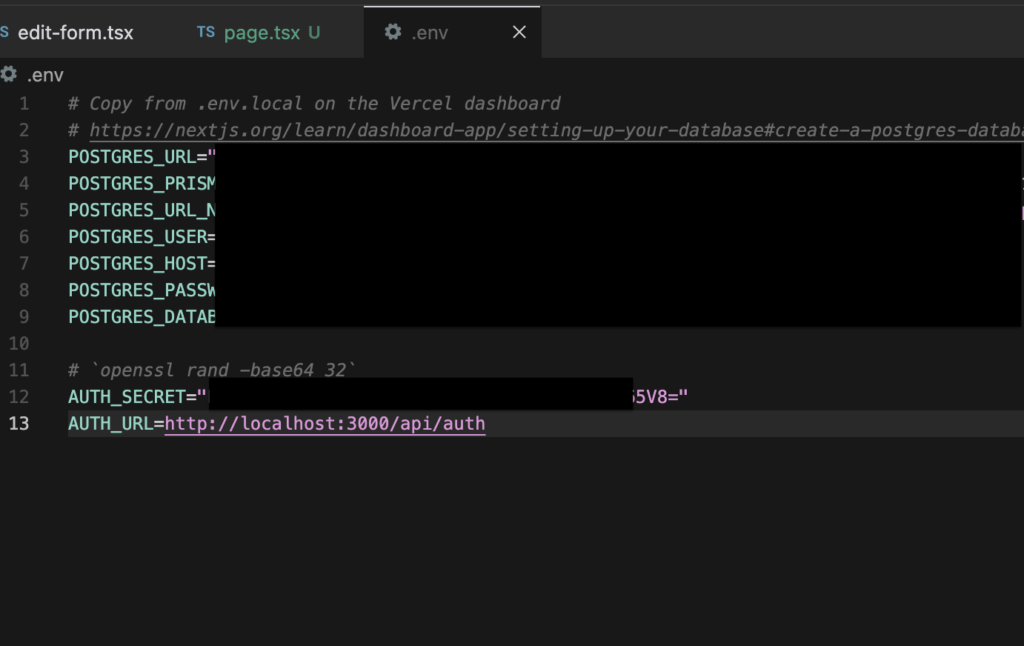
次に、アプリケーションの秘密キーを生成します。このキーはCookieの暗号化に使用され、ユーザーセッションのセキュリティが確保されます。これを行うには、ターミナルで下記のコマンドを実行します。
openssl rand -base64 32次に、「.env」ファイルで、生成されたキーをAUTH_SECRET変数に追加します。
※上記コマンドでターミナルに出力された文字列(下の画像で表示されているが、最後の4文字だけ見せている(5V8=))を.envに「AUTH_SECRET=”……5V8=”」と書いておく)

※Verceに作った本番環境で認証を機能させるには、Vercelプロジェクトの環境変数も更新する必要があります。Vercelに環境変数を追加する方法については、このガイドを確認してください。
ページオプションの追加(Adding the pages option)
authConfigオブジェクトをエクスポートする「auth.config.ts」ファイルをプロジェクトのルートに作成します。このオブジェクトには、NextAuth.jsの構成オプションが含まれます。現時点では、pagesオプションのみが含まれます。
import type { NextAuthConfig } from 'next-auth';

export const authConfig = {
  pages: {
    signIn: '/login',
  },
};
pagesオプションを使用して、カスタムサインイン、サインアウト、エラーページのルートを指定できます。これは必須ではありませんが、上記のように「signIn: ‘/login’」をpagesオプションに追加すると、ユーザーはNextAuth.jsのデフォルトページではなく、カスタムログインページにリダイレクトされます。
Next.jsのミドルウェアでルート(ページ)を保護する(Protecting your routes with Next.js Middleware)
次に、下記のようにルートを保護するロジックを追加します。これにより、ユーザーはログインしないとダッシュボードページにアクセスできなくなります。
import type { NextAuthConfig } from 'next-auth';

export const authConfig = {
  pages: {
    signIn: '/login',
  },
  callbacks: {
    authorized({ auth, request: { nextUrl } }) {
      const isLoggedIn = !!auth?.user;
      const isOnDashboard = nextUrl.pathname.startsWith('/dashboard');
      if (isOnDashboard) {
        if (isLoggedIn) return true;
        return false; // 認証されていないユーザーをログイン ページにリダイレクトします
      } else if (isLoggedIn) {
        return Response.redirect(new URL('/dashboard', nextUrl));
      }
      return true;
    },
  },
  providers: [], // Add providers with an empty array for now
} satisfies NextAuthConfig;
認可済のcallbackは、リクエストがNext.jsのミドルウェアを介してページにアクセスすることを承認されているかどうかを確認するために使用されます。これはリクエストが完了する前に呼び出され、authプロパティとrequestプロパティを持つオブジェクトを受け取ります。 authプロパティにはユーザーのセッションが含まれ、requestプロパティには受信リクエストが含まれます。
providersオプションは、さまざまなログインオプションを設定する配列です。現時点では、NextAuth構成の条件を満たすため、空の配列でOKです。詳細については、のちの「Adding the Credentials provider」セクションで説明します。
次に、authConfigオブジェクトを「Middleware」ファイルにインポートする必要があります。プロジェクトのルートに、「middleware.ts」というファイルを作成し、下記のコードを貼り付けます。
import NextAuth from 'next-auth';
import { authConfig } from './auth.config';

export default NextAuth(authConfig).auth;

export const config = {
  // https://nextjs.org/docs/app/building-your-application/routing/middleware#matcher
  matcher: ['/((?!api|_next/static|_next/image|.*\\.png$).*)'],
};
ここでは、authConfigオブジェクトを使用してNextAuth.jsを初期化し、authプロパティをエクスポートしています。 また、ミドルウェアのmatcherオプションを使用して、特定のパスで実行するように指定しています。
このタスクにミドルウェアを採用する利点は、ミドルウェアが認証を検証するまで保護されたルートのレンダリングが開始されず、アプリケーションのセキュリティとパフォーマンスの両方が向上することです。
パスワードのハッシュ化(Adding the Credentials provider)
パスワードをデータベースに保存する前にハッシュ化することをお勧めします。ハッシュ化により、パスワードがランダムに見える固定長の文字列に変換され、ユーザーのデータが漏洩した場合でも、ランダムな文字列なので、セキュリティが固くなります。
seed.jsファイルでは、「bcrypt」というパッケージを使用して、ユーザーのパスワードをデータベースに保存する前にハッシュ化しました。このCahpterの後半でこれを再度使用して、ユーザーが入力したパスワードがデータベース内のパスワードと一致するかどうかを比較します。ただし、bcryptパッケージ用に別のファイルを作成する必要があります。これは、bcryptがNext.jsのMiddlewareでは使用できないNode.js APIに依存しているためです。
下記のようにauth.tsという新しいファイルを作成して、authConfigオブジェクトを展開します。
import NextAuth from 'next-auth';
import { authConfig } from './auth.config';

export const { auth, signIn, signOut } = NextAuth({
  ...authConfig,
});
Credentials providerの追加(Adding the Credentials provider)
次に、NextAuth.jsのprovidersオプションを追加する必要があります。 providersは、GoogleやGitHubなどのさまざまなログインオプションを設定する配列です。 このコースでは、「Credentials provider」の使用のみに焦点を当てます。
Credentials providerを使用すると、ユーザーはユーザー名とパスワードを使用してログインできます。
import NextAuth from 'next-auth';
import { authConfig } from './auth.config';
import Credentials from 'next-auth/providers/credentials';

export const { auth, signIn, signOut } = NextAuth({
  ...authConfig,
  providers: [Credentials({})],
});
ここではCredentials providerを使用していますが、一般的には、「OAuth provider」や「email provider」プロバイダーなどの代替プロバイダーを使用することをお勧めします。オプションの全てのリストについては、NextAuth.jsのドキュメントを参照してください。
サインイン機能の追加(Adding the sign in functionality)
認証ロジックを処理を作るために、authorize関数を使用できます。そして、下記のようにして、Server Actionsと同様に、データベースにユーザーが存在するかどうかを確認する前に、zodを使用して電子メールとパスワードを検証できます。
import NextAuth from 'next-auth';
import { authConfig } from './auth.config';
import Credentials from 'next-auth/providers/credentials';
import { z } from 'zod';

export const { auth, signIn, signOut } = NextAuth({
  ...authConfig,
  providers: [
    Credentials({
      async authorize(credentials) {
        const parsedCredentials = z
          .object({ email: z.string().email(), password: z.string().min(6) })
          .safeParse(credentials);
      },
    }),
  ],
});
資格情報を検証した後、データベースからユーザーを取得するために、下記のように新しくgetUser関数を作成します。
import NextAuth from 'next-auth';
import Credentials from 'next-auth/providers/credentials';
import { authConfig } from './auth.config';
import { z } from 'zod';
import { sql } from '@vercel/postgres';
import type { User } from '@/app/lib/definitions';
import bcrypt from 'bcrypt';

async function getUser(email: string): Promise<User | undefined> {
  try {
    const user = await sql<User>`SELECT * FROM users WHERE email=${email}`;
    return user.rows[0];
  } catch (error) {
    console.error('Failed to fetch user:', error);
    throw new Error('Failed to fetch user.');
  }
}

export const { auth, signIn, signOut } = NextAuth({
  ...authConfig,
  providers: [
    Credentials({
      async authorize(credentials) {
        const parsedCredentials = z
          .object({ email: z.string().email(), password: z.string().min(6) })
          .safeParse(credentials);

        if (parsedCredentials.success) {
          const { email, password } = parsedCredentials.data;
          const user = await getUser(email);
          if (!user) return null;
        }

        return null;
      },
    }),
  ],
});
次に、 下記のように、「bcrypt.compare」を呼び出して、パスワードが一致するかどうかを確認します。
import NextAuth from 'next-auth';
import Credentials from 'next-auth/providers/credentials';
import { authConfig } from './auth.config';
import { sql } from '@vercel/postgres';
import { z } from 'zod';
import type { User } from '@/app/lib/definitions';
import bcrypt from 'bcrypt';

// ...

export const { auth, signIn, signOut } = NextAuth({
  ...authConfig,
  providers: [
    Credentials({
      async authorize(credentials) {
        // ...

        if (parsedCredentials.success) {
          const { email, password } = parsedCredentials.data;
          const user = await getUser(email);
          if (!user) return null;
          const passwordsMatch = await bcrypt.compare(password, user.password);

          if (passwordsMatch) return user;
        }

        console.log('Invalid credentials');
        return null;
      },
    }),
  ],
});
最後に、パスワードが一致する場合はユーザーを返し、一致しない場合はnullを返してユーザーがログインできないようにします。
ログインフォームの更新(Updating the login form)
次に、認証ロジックをログインフォームに接続する必要があります。「/app/lib/actions.ts」ファイルに、下記のように「authenticate」という新しいアクションを作成します。このアクションでは、auth.tsからSignIn関数をインポートする必要があります。
import { signIn } from '@/auth';
import { AuthError } from 'next-auth';

// ...

export async function authenticate(
  prevState: string | undefined,
  formData: FormData,
) {
  try {
    await signIn('credentials', formData);
  } catch (error) {
    if (error instanceof AuthError) {
      switch (error.type) {
        case 'CredentialsSignin':
          return 'Invalid credentials.';
        default:
          return 'Something went wrong.';
      }
    }
    throw error;
  }
}「CredentialsSignin」エラーがある場合は、適切なエラーメッセージを表示する必要があります。NextAuth.jsのエラーについては、ドキュメントで確認できます。
最後に、下記のように「app/ui/login-form.tsx」コンポーネントで、ReactのuseFormStateを使用してサーバーアクションを呼び出してフォームエラーを処理し、useFormStatusを使用してフォームの保留状態を処理できます。
'use client';

import { lusitana } from '@/app/ui/fonts';
import {
  AtSymbolIcon,
  KeyIcon,
  ExclamationCircleIcon,
} from '@heroicons/react/24/outline';
import { ArrowRightIcon } from '@heroicons/react/20/solid';
import { Button } from '@/app/ui/button';
import { useFormState, useFormStatus } from 'react-dom';
import { authenticate } from '@/app/lib/actions';

export default function LoginForm() {
  const [errorMessage, dispatch] = useFormState(authenticate, undefined);

  return (
    <form action={dispatch} className="space-y-3">
      <div className="flex-1 rounded-lg bg-gray-50 px-6 pb-4 pt-8">
        <h1 className={`${lusitana.className} mb-3 text-2xl`}>
          Please log in to continue.
        </h1>
        <div className="w-full">
          <div>
            <label
              className="mb-3 mt-5 block text-xs font-medium text-gray-900"
              htmlFor="email"
            >
              Email
            </label>
            <div className="relative">
              <input
                className="peer block w-full rounded-md border border-gray-200 py-[9px] pl-10 text-sm outline-2 placeholder:text-gray-500"
                id="email"
                type="email"
                name="email"
                placeholder="Enter your email address"
                required
              />
              <AtSymbolIcon className="pointer-events-none absolute left-3 top-1/2 h-[18px] w-[18px] -translate-y-1/2 text-gray-500 peer-focus:text-gray-900" />
            </div>
          </div>
          <div className="mt-4">
            <label
              className="mb-3 mt-5 block text-xs font-medium text-gray-900"
              htmlFor="password"
            >
              Password
            </label>
            <div className="relative">
              <input
                className="peer block w-full rounded-md border border-gray-200 py-[9px] pl-10 text-sm outline-2 placeholder:text-gray-500"
                id="password"
                type="password"
                name="password"
                placeholder="Enter password"
                required
                minLength={6}
              />
              <KeyIcon className="pointer-events-none absolute left-3 top-1/2 h-[18px] w-[18px] -translate-y-1/2 text-gray-500 peer-focus:text-gray-900" />
            </div>
          </div>
        </div>
        <LoginButton />
        <div
          className="flex h-8 items-end space-x-1"
          aria-live="polite"
          aria-atomic="true"
        >
          {errorMessage && (
            <>
              <ExclamationCircleIcon className="h-5 w-5 text-red-500" />
              <p className="text-sm text-red-500">{errorMessage}</p>
            </>
          )}
        </div>
      </div>
    </form>
  );
}

function LoginButton() {
  const { pending } = useFormStatus();

  return (
    <Button className="mt-4 w-full" aria-disabled={pending}>
      Log in <ArrowRightIcon className="ml-auto h-5 w-5 text-gray-50" />
    </Button>
  );
}
ログアウト機能の追加(Adding the logout functionality)
ログアウト機能を<SideNav />に追加します。下記のように、auth.tsからSignOut関数を呼び出して<form>要素のaction属性に設定します。
import Link from 'next/link';
import NavLinks from '@/app/ui/dashboard/nav-links';
import AcmeLogo from '@/app/ui/acme-logo';
import { PowerIcon } from '@heroicons/react/24/outline';
import { signOut } from '@/auth';

export default function SideNav() {
  return (
    <div className="flex h-full flex-col px-3 py-4 md:px-2">
      // ...
      <div className="flex grow flex-row justify-between space-x-2 md:flex-col md:space-x-0 md:space-y-2">
        <NavLinks />
        <div className="hidden h-auto w-full grow rounded-md bg-gray-50 md:block"></div>
        <form
          action={async () => {
            'use server';
            await signOut();
          }}
        >
          <button className="flex h-[48px] grow items-center justify-center gap-2 rounded-md bg-gray-50 p-3 text-sm font-medium hover:bg-sky-100 hover:text-blue-600 md:flex-none md:justify-start md:p-2 md:px-3">
            <PowerIcon className="w-6" />
            <div className="hidden md:block">Sign Out</div>
          </button>
        </form>
      </div>
    </div>
  );
}
これでログインログアウトを実装できましたので試してみます。下記の情報を使いましょう。
- Email: user@nextmail.com
- Password:
123456
Chapter 16(Adding Authentication)
メタデータはSEOと(SNSなどで)共有するときにとって非常に重要です。このChapterでは、Next.jsアプリケーションにメタデータを追加する方法について説明します。
メタデータとは?(What is metadata?)
Web開発では、メタデータはWebページに関する追加の詳細を提供します。メタデータは、ページを訪問するユーザーには表示されません。代わりに、ページのHTML内 (通常は<head>要素内) に埋め込まれ、裏で動作します。この隠された情報は、Webページのコンテンツをより深く理解する必要がある検索エンジンやその他のシステムにとって非常に重要です。
メタデータはなぜ重要?(Why is metadata important?)
メタデータは、Web ページのSEOを強化し、検索エンジンやソーシャルメディアプラットフォームにとってWebページをよりアクセスしやすく、理解しやすくする上で重要な役割を果たします。 適切なメタデータは、検索エンジンがWebページのインデックスを効果的に作成し、検索結果でのランキングを向上させるのに役立ちます。さらに、Open Graphのようなメタデータにより、ソーシャルメディア上の共有リンクの外観が改善され、コンテンツがユーザーにとってより魅力的で有益なものになります。
メタデータの種類(Types of metadata)
メタデータにはさまざまな種類があり、一般的には次のようなものがあります。
titleメタデータ : ブラウザーのタブに表示されるWebページのタイトルを設定するものです。これは検索エンジンがWebページの内容を理解するのに役立つため、SEO にとって非常に重要です。
<title>Page Title</title>descriptionメタデータ : このメタデータは、Webページのコンテンツの簡単な概要を設定し、多くの場合、検索エンジンの結果に表示されます。
<meta name="description" content="A brief description of the page content." />keywordメタデータ : このメタデータには、Webページのコンテンツに関連するキーワードが含まれており、検索エンジンがページをインデックスするのに役立ちます。
<meta name="keywords" content="keyword1, keyword2, keyword3" />Open Graphメタデータ : このメタデータは、Webページがソーシャルメディアプラットフォームで共有される際に、タイトル、説明、プレビュー画像などの情報を表示するようにします。
<meta property="og:title" content="Title Here" />
<meta property="og:description" content="Description Here" />
<meta property="og:image" content="image_url_here" />
faviconメタデータ : このメタデータは、ブラウザのアドレスバーまたはタブに表示されるファビコン (小さなアイコン) をWebページにリンクします。
<link rel="icon" href="path/to/favicon.ico" />メタデータの追加(Adding metadata)
Next.jsには、アプリケーションのメタデータを定義するために使用できるメタデータAPIがあります。 アプリケーションにメタデータを追加するには、次の2つの方法があります。
- 構成ベース : 静的メタデータオブジェクトまたは動的generateMetadata関数をlayout.jsまたはpage.jsファイルにエクスポートします。
- ファイルベース : Next.jsには、下記のようなメタデータの目的に特に使用されるさまざまな特殊ファイルがあります。
- favicon.ico、apple-icon.jpg、icon.jpg : ファビコンとアイコンに使用されます。
- opengraph-image.jpg および twitter-image.jpg : ソーシャルメディア画像に使用されます。
- robots.txt : 検索エンジンのクロールに関する手順を提供します。
- sitemap.xml : Webサイトの構造に関する情報を提供します。
これらのファイルを静的メタデータとして柔軟に使用することも、プロジェクト内でプログラムによって生成することもできます。
これらの両方のオプションを使用すると、Next.jsはページに関連する<head>要素を自動的に生成します。
ではまずfaviconとOpen Graphの画像を設定していきます。
/publicフォルダーの、favicon.icoとopengraph-image.jpgという2つの画像を「/app」フォルダーのルートに移動します。
そうすると、Next.jsはこれらのファイルを自動的に識別し、faviconおよびOG画像として使用します。これは、開発ツールでアプリケーションの要素をチェックすることで確認できます。
※ImageResponseコンストラクターを使用して動的なOG画像を作成することもできます。
続いて、titleとdescriptionsの設定をします。
layout.jsまたはpage.jsファイルにメタデータオブジェクトを含める(設定する)ことで、titleやdescriptionなどのページ情報を追加することができます。layout.js内のメタデータは、それを使用するすべてのページに継承されます。
「/app/layout.tsx」で、下記のフィールドを含む新しいメタデータオブジェクトを作成します。
import { Metadata } from 'next';

export const metadata: Metadata = {
  title: 'Acme Dashboard',
  description: 'The official Next.js Course Dashboard, built with App Router.',
  metadataBase: new URL('https://next-learn-dashboard.vercel.sh'),
};

export default function RootLayout() {
  // ...
}
上記でNext.jsは、タイトルとメタデータをアプリケーションに自動的に追加します。
しかし、特定のページにカスタムタイトルを追加したい場合もあるかと思います。
これを行うには、ページ自体にメタデータオブジェクトを追加します。ネストされたページのメタデータは、親のメタデータをオーバーライドします。
たとえば、「/app/dashboard/invoices/page.tsx」ページでは、下記のようにすればページタイトルを更新できます。
import { Metadata } from 'next';

export const metadata: Metadata = {
  title: 'Invoices | Acme Dashboard',
};
さらに、例えば「会社名」などすべてのページで共通のものをテンプレート化します。(「会社名」の変更があった場合にすべてのページを修正を加えるのはめんどう…)
下記のように、title.templateフィールドを使用して定義が可能です。
import { Metadata } from 'next';

export const metadata: Metadata = {
  title: {
    template: '%s | Acme Dashboard',
    default: 'Acme Dashboard',
  },
  description: 'The official Next.js Learn Dashboard built with App Router.',
  metadataBase: new URL('https://next-learn-dashboard.vercel.sh'),
};template内の「%s」は、特定のページタイトルに置き換えられます。
これで、「/app/dashboard/invoices」ページに下記のようにページタイトルを追加できます。
export const metadata: Metadata = {
title: 'Invoices',
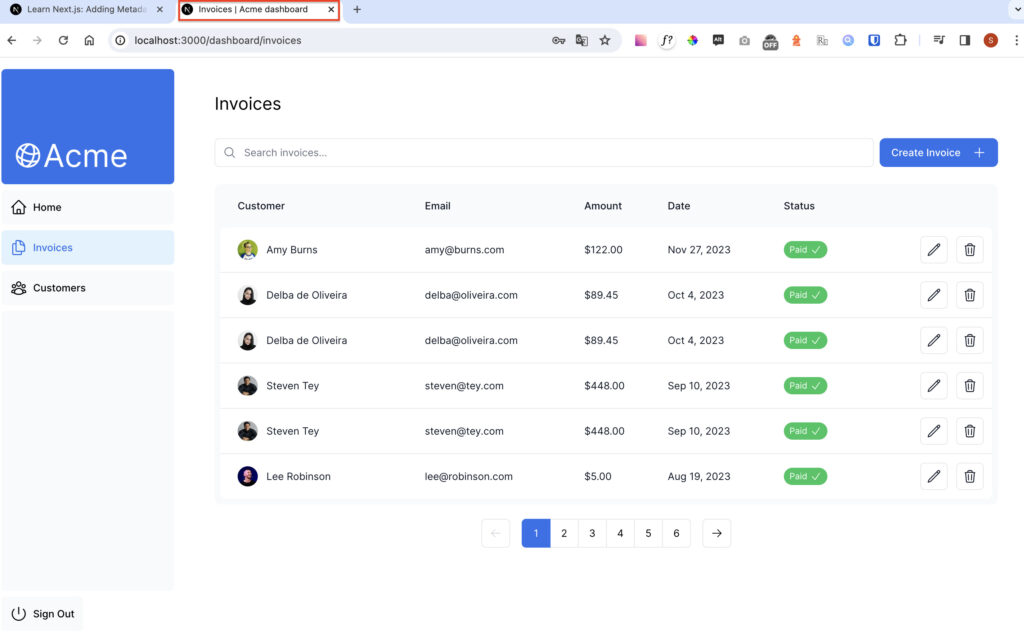
};「/dashboard/invoices」ページに移動し、<head>要素を確認します。ページのタイトルが「Invvoices | Acme Dashboard」になっていることがわかります。

演習: メタデータの追加(Practice: Adding metadata)
メタデータについて学習したので、下記のページにタイトルを追加して練習してください。
- /login
- /dashboard
- /dashboard/customers
- /dashboard/invoices/create
- /dashboard/invoices/[id]/edit
Next.jsメタデータAPIは強力かつ柔軟で、アプリケーションのメタデータを完全に制御できます。ここでは、基本的なメタデータを追加する方法を説明しましたが、keywords、robots、canonicalなどの複数のフィールドを追加することもできます。ドキュメントを参照し、必要なメタデータをアプリケーションに追加してください。
終わりに
Chapter13〜Chapter16までを見てきました!
これでこのチュートリアルは終了です。
ただ、チュートリアルの終わりに下記のようにありました。
But this is just the beginning—Next.js has many other features. It’s designed to help you build small side projects, your next startup idea, or even large-scale applications with your team.
(しかし、これはほんの始まりにすぎません。Next.jsには他にも多くの機能があります。 小規模なサイドプロジェクト、次のスタートアップのアイデア、さらにはチームで大規模なアプリケーションを構築できるように設計されています。)
Learn Next.js: Next Steps | Next.js(https://nextjs.org/learn/dashboard-app/next-steps)
まだまだ学ぶことがたくさんありそうなので、次はNext.jsを使って何か作ろうかと考えております!٩( ‘ω’ )و(たぶん)
(僕も使いました)
動画
【2023年最新】React(v18)完全入門ガイド|Hooks、Next.js、Redux、TypeScript書籍